How to install Mycontroller on the RaspberryPI (or any other linux/UNIX system)
-
This article is work in progress, all feedback is appreciated!!
Please follow the steps below to install mycontroller on the RPI.
The manual below is divided in 4 parts:
1. Setting up the RPI with a good JAVA version
2. Installing Mycontroller
3. Connecting to the gateway
4. Starting Mycontroller at boot time(If there are any questions, try the search function first on the forum)
1. Setting up the RPI with a good JAVA version
In this example i downloaded the 32bit version.... (jdk-8u101-linux-arm32-vfp-hflt.tar.gz)
Today (November 3 2017 jdk-8u151-linux-arm32-vfp-hflt.tar.gz is the latest version)Step 1:
goto: http://www.oracle.com/technetwork/java/javase/downloads/jdk8-downloads-2133151.html, click the download button of Java Platform (JDK) 8. Click to Accept License Agreement, download jdk-8-linux-arm-vfp-hflt.tar.gz for Linux ARM v6/v7 Hard Float ABI.(If you are running your RPI headless you need to download the software and transfer it using i.e. sftp in binary mode into your RPI, see step 2)
Step 2
goto the directory where you downloaded the software.sftp user@192.168.178.111 (192.168.178.111 is just an example, use the IP / hostname of the RPI) bin hash put jdk-8u101-linux-arm32-vfp-hflt.tar.gzpress control-D to close the connection.
Step 3:
Once the software is located on the RPI:Log-in Raspberry Pi, enter the command to extract jdk-8u101-linux-arm32-vfp-hflt.tar.gz to /opt directory.
$ sudo tar zxvf jdk-8u101-linux-arm32-vfp-hflt.tar.gz -C /optSet default java and javac to the new installed jdk8.
$ sudo update-alternatives --install /usr/bin/javac javac /opt/jdk1.8.0_101/bin/javac 1
$ sudo update-alternatives --install /usr/bin/java java /opt/jdk1.8.0_101/bin/java 1

$ sudo update-alternatives --config javac
$ sudo update-alternatives --config java
After all is completed successful, verify with the commands below.
$ java -version
$ javac -version
(Source: http://www.rpiblog.com/2014/03/installing-oracle-jdk-8-on-raspberry-pi.html)
and this topic2. Installing Mycontroller
The Mycontroller software is available on github: https://github.com/mycontroller-org/mycontroller ,or if you want to download the software directly click hereIMPORTANT: 1.0.0.Final was the latest one when this blog has written, maybe older when you installing, download the latest version from https://mycontroller.org/#/downloads
First logon to thr RPI with i.e. ssh, once logged on:
wget https://github.com/mycontroller-org/mycontroller/releases/download/1.0.0.Final/mycontroller-dist-standalone-1.0.0.Final-bundle.tar.gzOnce the file is downloaded, extract the archive:
gunzip -c mycontroller-dist-standalone-1.0.0.Final-bundle.tar.gz | tar -xvf -you should now see a directory called "mycontroller"
# ls -l
total 33104
drwxr-xr-x 7 root root     4096 Nov  3 15:10 mycontroller
Now the mycontroller software is on the system, you might want to move it to a directory of choice... (or not, up to you :))
sudo mv ./mycontroller /optNow it is time to start mycontroller
go into the mycontroller/bin directory:
cd /opt/mycontroller/binand start mycontroler with the command:
sudo ./start.shYou should see the output below
/usr/bin/java
java version: 1.8.0_151
Start issued for Mycontroller
(You might have guessed it but stopping mycontroller is done with the stop.sh command)
Now point a webbrowser to: https://<IP-OF-YOUR-RPI>:8443
You should see a login screenIf all of the above works, it is time to connect mycontroller to the radio, so goto step 3.
3. Connecting to the gateway
There are 2 ways of connecting the NRF24L01 radio,
- directly to the GPIO header, (See this article) from mysensors.org
- connected to an arduino and the arduino to USB of the RPI, (see this article) from mysensors.org
The example below is based on an arduino connected to USB:
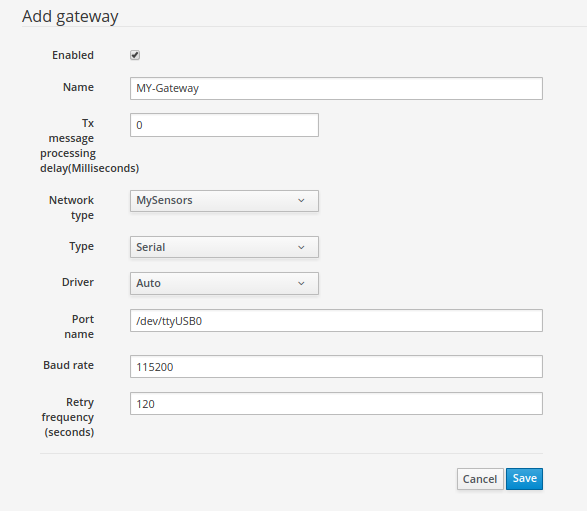
I might be that the device file for your arduino is different compared to the example, some tips to find your device file:sudo dmesg | grep ttyor:
sudo ls -l /dev | grep ttyand look for device files that point you to an USB one.
Do not forget to add the user account you are using to the dialout group in /etc/group (only aplies to non-root user accounts!)
4. How to auto-start mycontroller at boot time
If Mycontroller needs to be started at boot time, it can be easily done with the script below:
(make sure you change the path in the script to the directory where mycontroller is installed!! in the example below it is /opt/mycontroller)- copy the contents below into a file called mycontroller in /etc/init.d
#! /bin/sh
# /etc/init.d/mycontroller

### BEGIN INIT INFO
# Provides:          mycontroller
# Required-Start:    $remote_fs $syslog
# Required-Stop:     $remote_fs $syslog
# Default-Start:     2 3 4 5
# Default-Stop:      0 1 6
# Short-Description: Start daemon at boot time
# Description:       Enable service provided by daemon.
### END INIT INFO


# The following part always gets executed.
#echo "This part always gets executed"

# The following part carries out specific functions depending on arguments.
case "$1" in
  start)
    echo "Starting Mycontroller"
        /opt/mycontroller/bin/start.sh
    ;;
  stop)
    echo "Stopping Mycontroller"
        /opt/mycontroller/bin/stop.sh
    ;;
  *)
    echo "Usage: /etc/init.d/mycontroller {start|stop}"
    exit 1
    ;;
esac

exit 0
Once the file is ready, make it executable:
sudo chmod 755 /etc/init.d/mycontrollerThe ls -l output should now be:
#ls -l /etc/init.d/mycontroller
-rwxr-xr-x 1 root root 790 Oct 22 11:32 /etc/init.d/mycontroller
once this is all fixed execute the command below:
sudo update-rc.d mycontroller defaultsif the system reboots, mycontroller will be stopped/started automagically!
check with:sudo service mycontroller status ● mycontroller.service - LSB: Start daemon at boot time Loaded: loaded (/etc/init.d/mycontroller) Active: active (exited) since Sat 2017-10-28 17:42:10 CEST; 1 weeks 1 days agoStopping mycontroller manually:
sudo service mycontroller stopStarting mycontroller manually:
sudo service mycontroller start -
@tag said in How to install Mycontroller on the RaspberryPI (or any other linux/UNIX system):
- Installing Mycontroller
The following commands in part 2 should be run with sudo:
sudo mv ./mycontroller /opt cd /opt/mycontroller/bin sudo ./start.sh -
You are right!, Thx!

Update done -
Thanks much for this tutorial.
If the mycontroller directory (part 2) is not moved to /opt, then the /etc/init.d/mycontroller script (part 4) needs to be edited appropriately.
-
The links in this getting started guide are quite old and should be updated. Or maybe better: Link to the download page instead: https://mycontroller.org/#/downloads
I ran
1.0.0.Finalfor some days now and wasn't aware that this is an old release. -
@benhub Thank you! I have added the following lines in the original blog.
IMPORTANT: 1.0.0.Final was the latest one when this blog has written, maybe older when you installing, download the latest version from https://mycontroller.org/#/downloads
-
@Tag said in How to install Mycontroller on the RaspberryPI (or any other linux/UNIX system):
- Connecting to the gateway
There are 2 ways of connecting the NRF24L01 radio,
What about ESP8266 gateway?
- Connecting to the gateway
-
What about ESP8266 gateway?
What type of library are you using inside ESP8266? If MySensors it works
-
any change in the install process with MyController 1.4.0?
Is the JAVA version update still necessary with the new raspbian image (2019-04-08)?
keep up the good work
cheers
F -
@francois No changes for installation as far as I am aware.
As for Java, it's always best to use the latest version for security and compatibility unless there is a compelling reason to use an older version.
-
@francois There is no change in the installation process. You can use the latest version of java 1.8.x
-
@Tag All installation steps applied very well and mycontroller is running well.
except part 4 to start automatically as i ca not find a file under name: mycontroller inside init.d folder. also not able to create new text file inside same folder? -
Hi Sherrif!,
What error do you see?
have you tried to create the file in /etc/init.d with the command:sudo touch /etc/init.d/mycontroller