Sorry @jkandasa, I have been on the move travelled for the Christmas Holiday. so I am away from my nodes and sensors. But I have the MYC on my laptop. so here are the data you requested for.
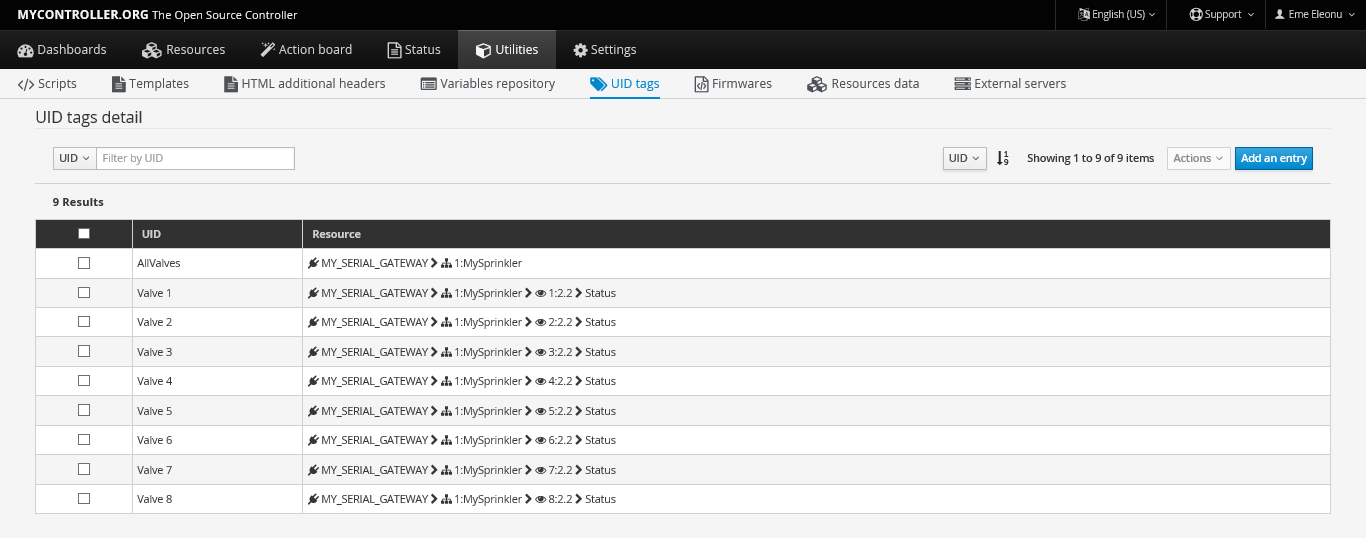
and the Variables - 
Sorry @jkandasa, I have been on the move travelled for the Christmas Holiday. so I am away from my nodes and sensors. But I have the MYC on my laptop. so here are the data you requested for.

and the Variables - 
What am I doing wrong? I am posting the Nodes and Sensors just incase... 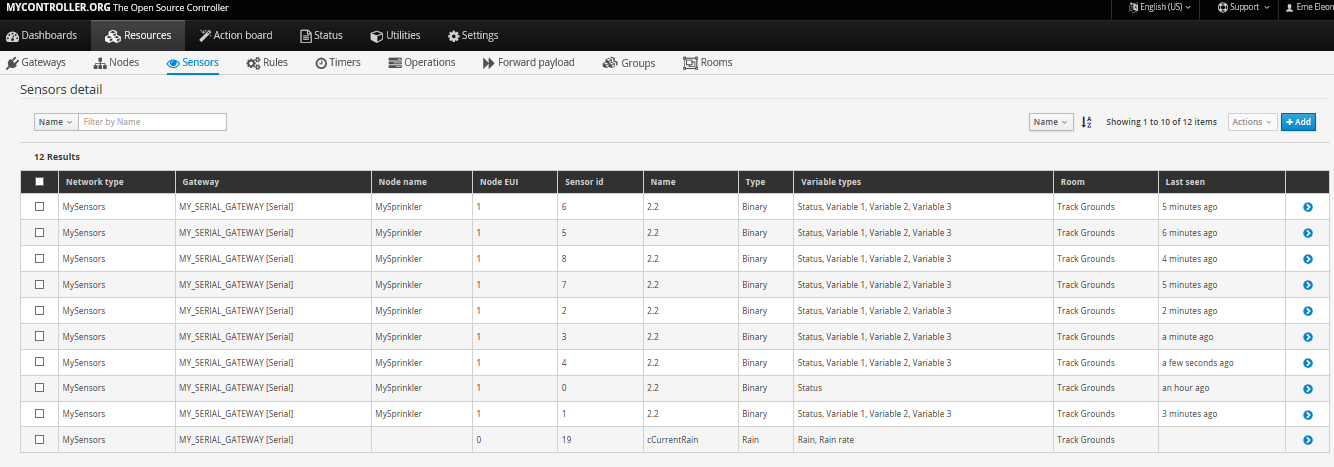
Hello @jkandasa
I have been out of town, haven't touched MYC for a while. Just popped intoday and tried my hands on the script. Ran it after creating the Operation and the Timmer to trigger and run it. But it wont tun. I get an error ```
{
  "errorMessage": "TypeError: Cannot get property \"status\" of null in <eval> at line number 8"
}
Here is the JS script that I edited for 8 valves
var myImports = new JavaImporter(java.io, java.lang, java.util);

with(myImports) {

  var LoopThroughValves = mcApi.variable().get("Status");

  //Check already running?
  if(LoopThroughValves.status !== 'running'){

    //Update as running
    valveStatus.value = "running";
    mcApi.variable().update(valveStatus);
    mcApi.logger().debug("Loop Through Valve Script Triggered...");

    var masterValve = mcApi.uidTag(0).getByUid("All Zones").getResource();
    var valve01 = mcApi.uidTag().getByUid("Zone 1").getResource();
    var valve02 = mcApi.uidTag().getByUid("Zone 2").getResource();
    var valve03 = mcApi.uidTag().getByUid("Zone 3").getResource();
    var valve04 = mcApi.uidTag().getByUid("Zone 4").getResource();
    var valve05 = mcApi.uidTag().getByUid("Zone 5").getResource();
    var valve06 = mcApi.uidTag().getByUid("Zone 6").getResource();
    var valve07 = mcApi.uidTag().getByUid("Zone 7").getResource();
    var valve08 = mcApi.uidTag().getByUid("Zone 8").getResource();

    var delayTime = 1000 * 60 * 10; //10 minutes

    //Turn ON master valve and Valve01
    masterValve.value = "1"; //Update master valve ON state
    mcApi.sensor().sendPayload(masterValve); //sensd state
    valve01.value = "1"; //Update valve01 ON state
    mcApi.sensor().sendPayload(valve01); //sensd state

    //Update valve01 is running
    valveStatus.value2 = "value01";
    mcApi.variable().update(valveStatus);
    //Wait time
    Thread.sleep(delayTime);

    //Turn OFF valve01 and turn ON valve02
    valve01.value = "0"; //Update valve01 OFF state
    mcApi.sensor().sendPayload(valve01); //send state
    valve02.value = "1"; //Update valve02 ON state
    mcApi.sensor().sendPayload(valve02); //send state

    //Update valve02 is running
    valveStatus.value2 = "value02";
    mcApi.variable().update(valveStatus);

    //Wait time
    Thread.sleep(delayTime);

    //Turn OFF valve02 and turn ON valve03
    valve02.value = "0"; //Update valve02 OFF state
    mcApi.sensor().sendPayload(valve02); //send state
    valve03.value = "1"; //Update valve03 ON state
    mcApi.sensor().sendPayload(valve03); //send state

    //Update valve03 is running
    valveStatus.value2 = "value03";
    mcApi.variable().update(valveStatus);

    //Wait time
    Thread.sleep(delayTime);

    //Turn OFF valve03 and turn ON valve04
    valve03.value = "0"; //Update valve03 OFF state
    mcApi.sensor().sendPayload(valve03); //send state
    valve04.value = "1"; //Update valve04 ON state
    mcApi.sensor().sendPayload(valve04); //send state

    //Update valve04 is running
    valveStatus.value3 = "value04";
    mcApi.variable().update(valveStatus);

    //Wait time
    Thread.sleep(delayTime);

    //Turn OFF valve04 and turn ON valve05
    valve04.value = "0"; //Update valve04 OFF state
    mcApi.sensor().sendPayload(valve04); //send state
    valve05.value = "1"; //Update valve05 ON state
    mcApi.sensor().sendPayload(valve05); //send state

    //Update valve05 is running
    valveStatus.value4 = "value05";
    mcApi.variable().update(valveStatus);

    //Wait time
    Thread.sleep(delayTime);

    //Turn OFF valve05 and turn ON valve06
    valve05.value = "0"; //Update valve05 OFF state
    mcApi.sensor().sendPayload(valve05); //send state
    valve06.value = "1"; //Update valve06 ON state
    mcApi.sensor().sendPayload(valve06); //send state

    //Update valve06 is running
    valveStatus.value5 = "value06";
    mcApi.variable().update(valveStatus);

    //Wait time
    Thread.sleep(delayTime);

    //Turn OFF valve06 and turn ON valve07
    valve06.value = "0"; //Update valve06 OFF state
    mcApi.sensor().sendPayload(valve06); //send state
    valve07.value = "1"; //Update valve07 ON state
    mcApi.sensor().sendPayload(valve07); //send state

    //Update valve06 is running
    valveStatus.value6 = "value07";
    mcApi.variable().update(valveStatus);

    //Wait time
    Thread.sleep(delayTime);


    //Turn OFF valve07 and turn ON valve08
    valve07.value = "0"; //Update valve07 OFF state
    mcApi.sensor().sendPayload(valve07); //send state
    valve08.value = "1"; //Update valve08 ON state
    mcApi.sensor().sendPayload(valve08); //send state

    //Update valve07 is running
    valveStatus.value7 = "value08";
    mcApi.variable().update(valveStatus);

    //Wait time
    Thread.sleep(delayTime);

    //Turn OFF valve08 and turn OFF master valve
    valve08.value = "0"; //Update valve08 OFF state
    mcApi.sensor().sendPayload(valve08); //send state
    masterValve.value = "0"; //Update master valve OFF state
    mcApi.sensor().sendPayload(masterValve); //send state

    //Update not running
    valveStatus.value = "stopped";
    valveStatus.value2 = "-";
    mcApi.variable().update(valveStatus);
    mcApi.logger().debug("Loop Through Valve Script Completed...");
  }else{
    mcApi.logger().warn("Loop Through Valve Script is already running...");
  }
}
This sounds like the solution to my weather issues. I was looking at OpenWeather and Yahoo until someone mentioned MetCheck... So @skywatch can you please tell me the procedure to pull weather information for MyC via metcheck. Is it free? Do I need to obtain a Key? Where do I append the endpoint in MyC? Can you show me a screengrab of your setup? Thanks in advance.
@skywatch so how do I create an end point to use this in MyController?
@skywatch Please can you create a link to the free weather service you are refereeing to. Metcheck. Thanks
I have created the UID Tags... See below, did I do it right?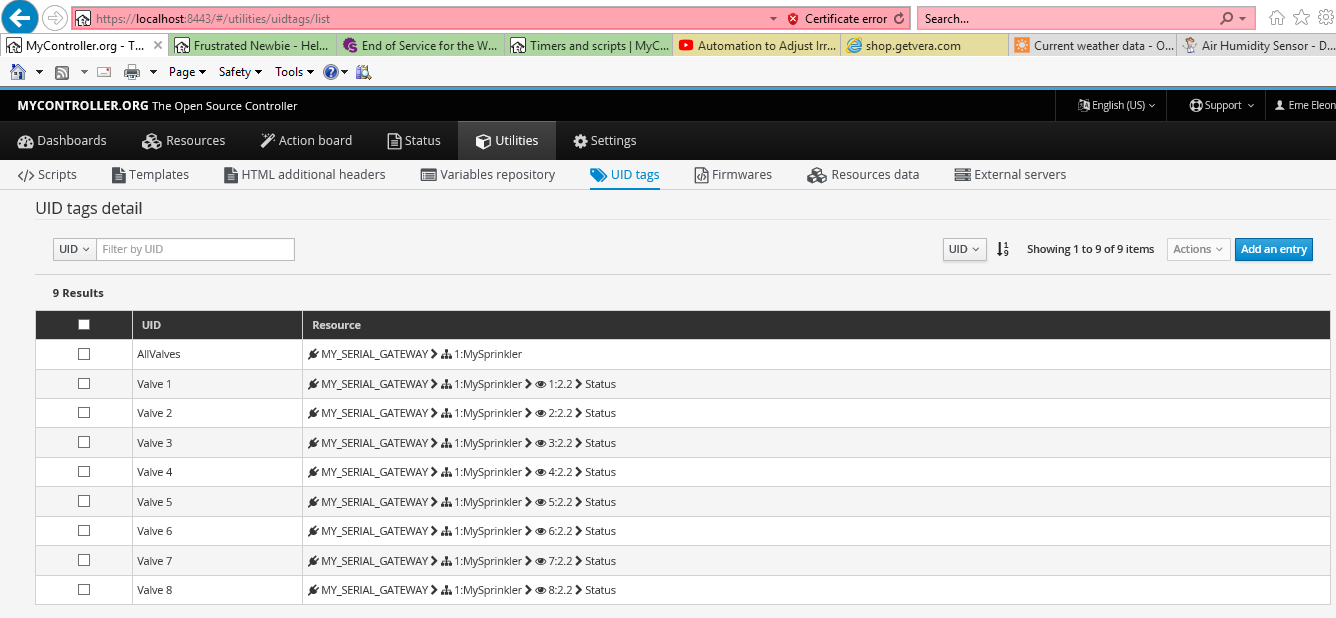
I then tried to create the JS script as described in your old reference you supplied... but I got an error.
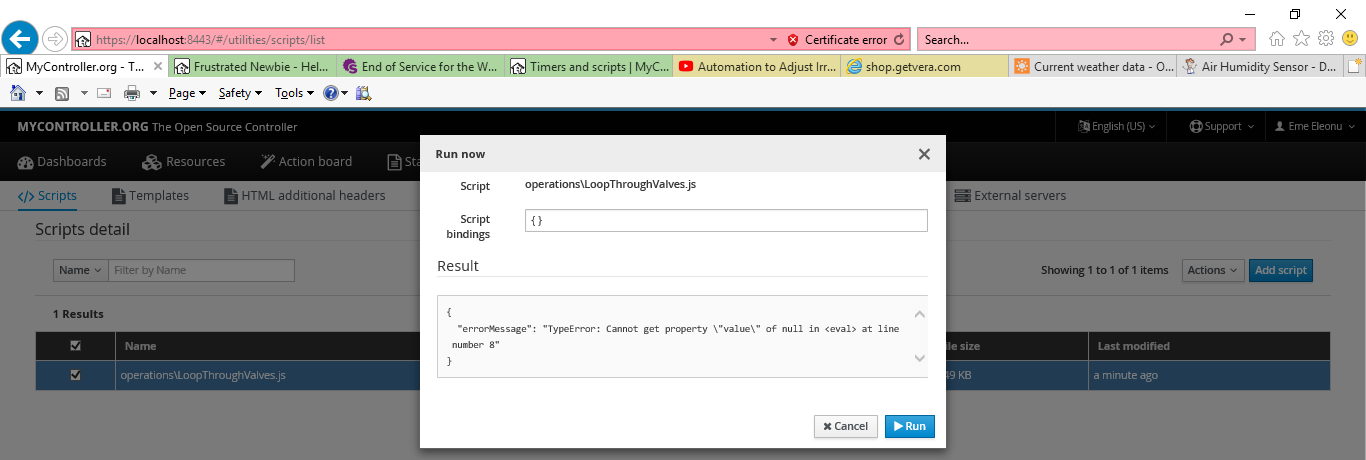
What are I doing wrong?
Thanks @jkandasa you are awesome support. I see the requestTime() function call in the sketch, but where in MyController do I add the node code?
void receiveTime(unsigned long _timestamp){
   // do actions with received time
}
@jkandasa I thought I was wrong, perhaps you stopped reading at some point, but I had to go back and read some more, and I will do a short summary here to save your time from reading it all over again.
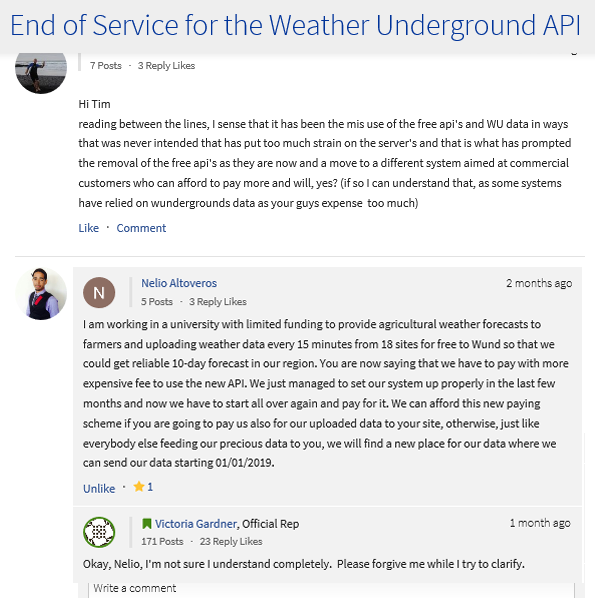
From all indications the Wundergroung community are a little bit disturbed by IBM who took over the crowd sourcing data service and now run it solely as a Business. The new management has given notice to stop serving free data and are now at a crossroads with their personal weather station PWS owners who upload these small packets of data to them for free (and have been doing so for over many many years.). The new management has committed to allow these PWS data suppliers to continue to enjoy free and easy access to their own data, but not the entire crowd sourced data - They have created an alternate purpose built service for this, albeit, at a small fee - $200/month.
From my own perspective, the service is closed for good to people like us, thinkerers and hobbyist who only want to read a tiny snippet of that record. As non-commercial users (including educationist) one would expect the WU to leave a window open, but their deadline will be in a few more days, and at this time, they have not yet provided any other access that is cheap enough for poor ppl like me, so I will say this door is shut for real.
In summary, below are the two comments that capture the essence of the ongoing fight. I wont hold my breath on this one, i am looking for an alternative.
Hello @njbuch I have just completed a MySensors Project for an 8 valve water sprinkler system, it requires Wunderground App to run, however, I just noticed that as at today, the service no longer exists for free. So I have opted for another alternative, Open Weather Services. I have obtained a key.
Do you think I have set it up right? Do you have other/better alternatives from open weather data that are MyController friendly? See a screen shot of my setup.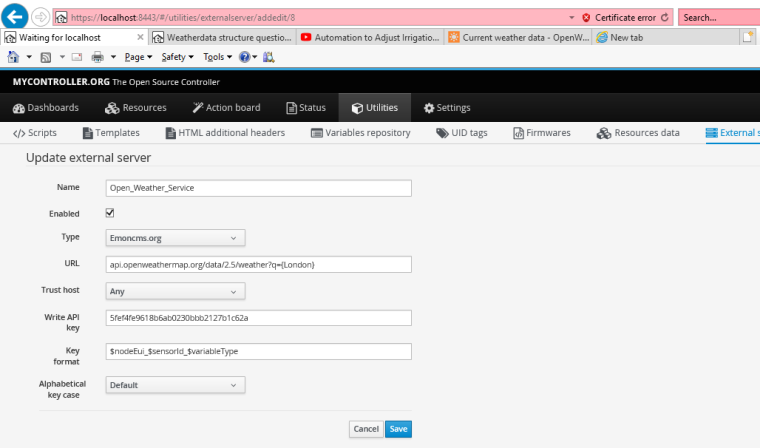
@tag Yes! All works well when they are next to each other on the same desk.
I have reverted the default baud rate and all is well. I have gone ahead to create Triggers and Conditions, Schedules, Actions, etc. But I somehow can not seem to tie all up to do what I want.
I want to do a whole lot of things, but lets start with the first one. I need to pull in time and date from the controller to my node. How do I do this? Can I have a simple example that shows the steps or syntax and I will try to do other stuff. The Mysensors node uses a project that pulls data from Weather Underground, which I learnt has stopped its free weather information services. I have researched the topic and found a likely alternative in Open Weather Service) . Is anyone using Open Weather? https://openweathermap.org/current)
@tag
 but that was exactly how it was until you said to change 38400 …. but it connected alright after | changed to 38400 and brought the node next to the laptop.
Please note that I am using a Nano for my gate way...
I thought the baud rate should be the same for Arduino and the Putty sniffer, I will revert to "38400"...
@tag Okay I will move them closer until I conclude with all the bugs, then I will move them apart and see if distance is the issue
by the way... is This project in this video a MySensors Gateway or something entirely new?
My Sprinkler node is downstairs - just about 7 meters below the spot where the MySensors Gateway + MyController laptop is (with about 2 concrete walls separating them). Does this matter? For the records, I have capacitor on both MySensors Gateway, and the Water Sprinkler node.
This is what ot looks like now...
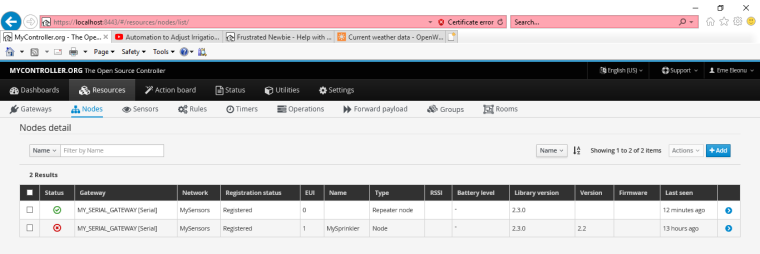
@jkandasa Thanks.
I disabled the MyController Gateway, then commented out the debug line on the sketch via IDE. and uploaded the sketch the the MySensors gateway @ COM5. Closed the IDE and restarted enabled the MyController Gateway --- but now one node is down while the Gateway connected successfully. 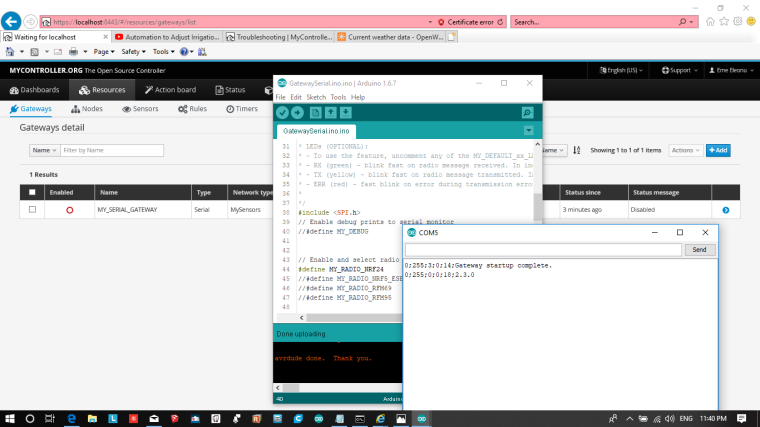
@jkandasa Wow! That really helped, I was able to not only connect to the MyController Gateway, but two Nodes discovered and Nine sensors discovered. Thanks @jkandasa you never know how hard I tried. all along, connecting and disconnecting Arduino and Putty intermittently without knowing that I was disturbing the line. see what it now looks like. 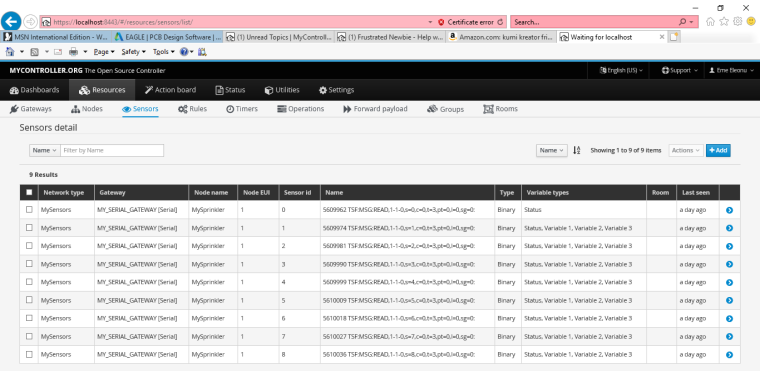
So can I continue troubleshooting my problems with this tread or should I create a new one?
@jkandasa Okay I have reverted to Com 5 for both MySensors Gateway and Com5 for Mycontroller. I restarted the controller and I was able to connect successfully. Phew!

That's done, you still didn't say if the certificate error has a role to play. I have connected the sprinkler package to an external power and I am running Putty on the side to listen to Com5 No cheese...
@jkandasa My Gateway is the no same as the tutorial on MySensors… I didn't change anything. Or should I? 
/**
* The MySensors Arduino library handles the wireless radio link and protocol
* between your home built sensors/actuators and HA controller of choice.
* The sensors forms a self healing radio network with optional repeaters. Each
* repeater and gateway builds a routing tables in EEPROM which keeps track of the
* network topology allowing messages to be routed to nodes.
*
* Created by Henrik Ekblad <henrik.ekblad@mysensors.org>
* Copyright (C) 2013-2015 Sensnology AB
* Full contributor list: https://github.com/mysensors/Arduino/graphs/contributors
*
* Documentation: http://www.mysensors.org
* Support Forum: http://forum.mysensors.org
*
* This program is free software; you can redistribute it and/or
* modify it under the terms of the GNU General Public License
* version 2 as published by the Free Software Foundation.
*
*******************************
*
* DESCRIPTION
* The ArduinoGateway prints data received from sensors on the serial link.
* The gateway accepts input on serial which will be sent out on radio network.
*
* The GW code is designed for Arduino Nano 328p / 16MHz
*
* Wire connections (OPTIONAL):
* - Inclusion button should be connected between digital pin 3 and GND
* - RX/TX/ERR leds need to be connected between +5V (anode) and digital pin 6/5/4 with resistor 270-330R in a series
*
* LEDs (OPTIONAL):
* - To use the feature, uncomment any of the MY_DEFAULT_xx_LED_PINs
* - RX (green) - blink fast on radio message received. In inclusion mode will blink fast only on presentation received
* - TX (yellow) - blink fast on radio message transmitted. In inclusion mode will blink slowly
* - ERR (red) - fast blink on error during transmission error or receive crc error
*
*/
#include <SPI.h>
// Enable debug prints to serial monitor
#define MY_DEBUG


// Enable and select radio type attached
#define MY_RADIO_NRF24
//#define MY_RADIO_NRF5_ESB
//#define MY_RADIO_RFM69
//#define MY_RADIO_RFM95

// Set LOW transmit power level as default, if you have an amplified NRF-module and
// power your radio separately with a good regulator you can turn up PA level.
#define MY_RF24_PA_LEVEL RF24_PA_LOW

// Enable serial gateway
#define MY_GATEWAY_SERIAL

// Define a lower baud rate for Arduinos running on 8 MHz (Arduino Pro Mini 3.3V & SenseBender)
#if F_CPU == 8000000L

//#define MY_BAUD_RATE 38400
#define MY_BAUD_RATE 115200
#endif

// Enable inclusion mode
#define MY_INCLUSION_MODE_FEATURE
// Enable Inclusion mode button on gateway
//#define MY_INCLUSION_BUTTON_FEATURE

// Inverses behavior of inclusion button (if using external pullup)
//#define MY_INCLUSION_BUTTON_EXTERNAL_PULLUP

// Set inclusion mode duration (in seconds)
#define MY_INCLUSION_MODE_DURATION 60
// Digital pin used for inclusion mode button
//#define MY_INCLUSION_MODE_BUTTON_PIN  3

// Set blinking period
#define MY_DEFAULT_LED_BLINK_PERIOD 300

// Inverses the behavior of leds
//#define MY_WITH_LEDS_BLINKING_INVERSE

// Flash leds on rx/tx/err
// Uncomment to override default HW configurations
//#define MY_DEFAULT_ERR_LED_PIN 4  // Error led pin
//#define MY_DEFAULT_RX_LED_PIN  6  // Receive led pin
//#define MY_DEFAULT_TX_LED_PIN  5  // the PCB, on board LED

#include <MySensors.h>

void setup()
{
	// Setup locally attached sensors
}

void presentation()
{
	// Present locally attached sensors
}

void loop()
{
	// Send locally attached sensor data here
}