Tag's Mycontroller/Mysensors setup
-
Approx 2 years ago i discovered the Mysensors library and i really liked it from the start.
Below i will try to explain a little on how i use my controller and what my setup of the sensors network is.The setup i am using is all NRF24L01 based, it includes a number of nodes, all with special purposes, from measuring, displaying data to controlling stuff.
First the most important part, the Mycontroller software. This is basically the heart of my IoT setup. Once i started with Mysensors, it became clear that you need a piece of software that gathers the data and makes nice graphs and such. I have looked at a number of controllers, but each time I ended up with Mysensors since it is very easy to implement, lightweight, looks awesome and works like a charm
")
So making the choice for Mycontroller was easy, and i have build a light weight server around it. I started with a normal PC, but that uses a lot of power and is basically overkill, so i switched to a RaspberryPI (Model B ) and this setup has run for over a year!, then i decided to start testing the OrangePI Zero, it is very cheap, has a quadcore CPU and 512Mb memory. Unfortunately the Mysensors gateway was not compiling on the OPI-0, but with a lot of help from the developers on the mysensors forum we were able to get it up and running. So what does my setup looks like, (today) since stuff will be added over time
My Setup:
The controller:
- OrangePI Zero (512Mb model)
- NRF24L01 direct attached to the GPIO header
- 16GB SD Card
- Running the Mycontroller software.
Sensor 1
- BMP085 barometric pressure sensor
- Using the temperature sensor from the BMP085 for the inside temperature
- Outside NTC for temperature
Sensor 2
- Rain Meter which measures the amount of water that fell from the sky
Sensor 3
Room temp sensor with a display that cycles through Time / Humidity / Temperature / Light level(Lux)- DHT22
- 8 character 7 segment display
- LDR to measure the light level
- Gets the time from the server.
- Various leds to display receive/transmit/error of data
Sensor 4
Just a display node, this is an arduino which has a 16x4 display attached and it receives all kind of data from the network. This is very nice since you can get an overview of data without logging on to a system.- Arduino nano
- 16x4 display
- NRF24L01 radio
Sensor 5
Water temperatures from the central heating system, it shows the temp of the water that goes into the system, the temperature of the water that is returned and the hot water usage for showers, dishes and so on.- 3x DS18B20
Sensor 6
Power usage, this sensor is connected to the P1 port of the smart power meter. it is a digital port that shows the current power usage, and all kinds stuff you want to know.- Arduino nano
- transistor
- bunch of resistors
Sensor 7
433Mhz Gateway that is used by Mycontroller to switch lights on and off based on the outside light level.- Arduino nano
- 433Mhz transmitter
Sensor 8
Outside battery operated sensor that was setup to see howlong a sensor is able to survive on just 2 AAA batteries- Arduino ProMini 3.3v with the powersaving mods (no voltage regulator / no led), in sleepmode it uses
5 microamps, and away 4 milliamps. It sleeps for 5 minutes, wakes up, measures and sends data. - LDR
- DHT22 (temperature and humidity)
- Buck converter to "push" the voltage to 3.3v
- Transistor to switch the sensors on on demand.
This is basically my setup!, still having fun measuring, but more fun also controlling!!
Update
- Also running mcagent now to monitor the server itself.
-
@tag This is awesome information.
Sensor 2
Rain Meter which measures the amount of water that fell from the sky
I would like to know how to measure rain, what type of meter are you using? Can you explain this with some support images? I would like to implement in my location
")
Sensor 8
Outside battery operated sensor that was setup to see howlong a sensor is able to survive on just 2 AAA batteriesHow many days once are you changing the battery?
-
Sure no problem, it is very simple, it is basically a tip over bucket I salvaged from an old weather station. It works with a magnet and a reed switch.
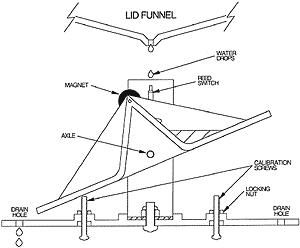
I am using basically the same:
All info + sketch can be foud hereThis sensor is not working on batteries, it can be done i guess the arduino needs to wake up on an interrupt.
Anyway I have build another one that works on batteries, with a DHT22 and an LDR, that one is appox 1 month old and still running fine.
Since i use an arduino promini at 8Mhz, the voltage cannot drop below 2.8v, it simply will not start anymore so after running it for 3 weeks in 2AAA batteries, i have added a buck converter to boost the voltage to 3.3v.
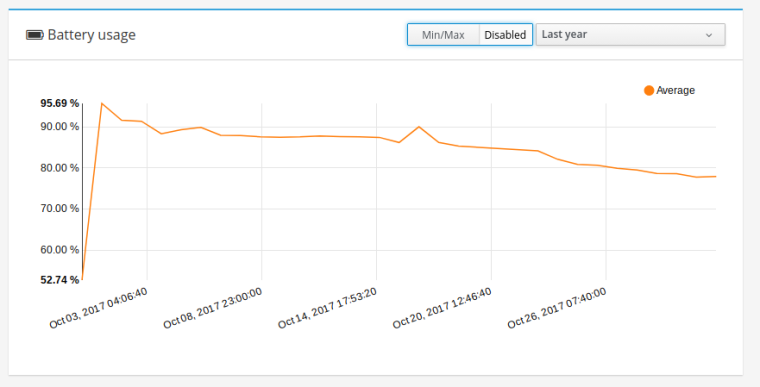
The peaks are from programming
What really helped me was this page.
I made the mods as described here, led and voltage regulator removal.
once the arduino is booted, i put it to sleep for 5 minutes, then if it wakes up i pull pin high that triggers a transistor which powers the light sensor and the DHT22.
Then once all is up, i do the measurements, send over the changes, and back to sleep again. I think that the batteries will last for atleast 9 months to a year (i hope), but time will tell -
@tag Thank you so much! This information helps to build my own rain meter.
-
-
-
just take a measuring cup, and pour water into the sensor until it "flips"
then measure the amount of water that has left the cup... -
Ah, OK - then I guess a little calculation to divide the ammount of water used by the area of the sensor top and you have a measuerment of rainfall volume/cm2 - but how to tell the mm of rainfall in general?
I guess that you could plug the hole in the sensor, fill to a known mm level and see how many 'tips' you get.....That should do it for me.
Does it get blocked with dust/moss etc much?
Cheers!
-
well nothing too serious for me
I took this example as the baseThe sensor itself still works perfectly :thumbs_up: