• Categories
    • Recent
    • Tags
    • Popular
    • Register
    • Login
    1. Home
    2. zachflem
    3. Best
    Z
    Offline
    • Profile
    • Following 0
    • Followers 0
    • Topics 4
    • Posts 14
    • Groups 0

    Posts

    Recent Best Controversial
    • HOW TO: Simple timer based relay activation

      PREFACE: I have struggled to get some simple things to work, and I think I was plain and simply overwhelmed with the amount of options presented to me. So now that I have these simple things working, I hope that writing this guide helps other new users get their system up and running without pulling out any hair!

      Simple timer based relay activation

      This guide goes through the steps need to create a schedule to turn on and off a relay. In my case, the relay was to operate a sprinkler valve at 1:00am, for 45 minutes, so the values used in the following instructions reflect my use case, and may not suit your specific needs.

      This first section, sets up the OPERATIONS used to turn the sensor (in this case, a relay) ON and OFF

      Setting the DELAY on the OFF OPERATION, does exactly what it sounds like. Delays the activation of that OPERATION by however many seconds are entered. To activate the OPERATION as soon as it is called, enter 0 for the delay.

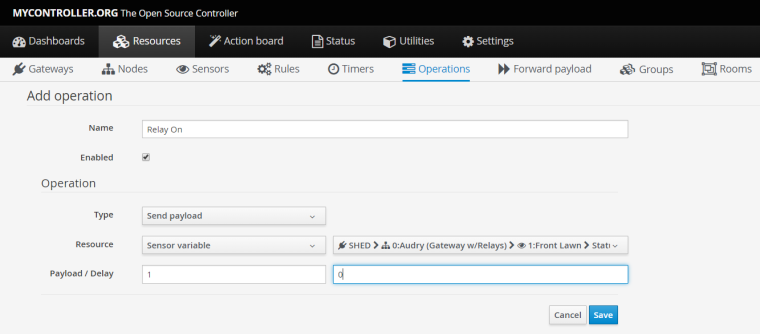
      1. Create an OPERATION to turn the RELAY ON
        a) Click RESOURCES > OPERATIONS > "Add Operation"
        b) Give your new OPERATION a name
        c) Select ENABLED
        d) OPERATION TYPE: Send Payload
        e) RESOURCE: Sensor Variable
        f) Select relay sensor from list
        g) PAYLOAD: 1 (ON)
        h) DELAY: 0
        i) Click SAVE

      0_1517652409131_createOperation_RelayOn.PNG

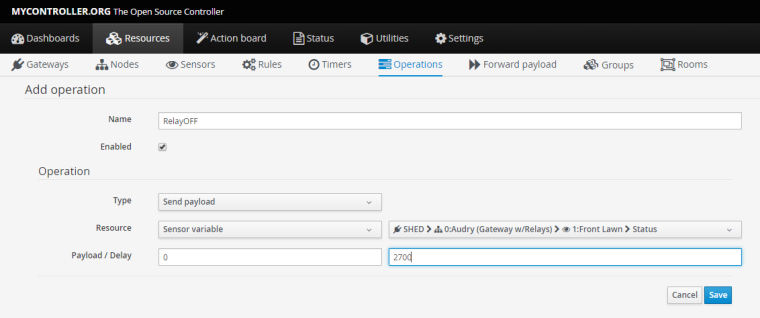
      1. Create an OPERATION to turn the RELAY OFF
        a) Click RESOURCES > OPERATIONS > "Add Operation"
        b) Give your new OPERATION a name
        c) Select ENABLED
        d) OPERATION TYPE: Send Payload
        e) RESOURCE: Sensor Variable
        f) Select relay sensor from list
        g) PAYLOAD: 0 (OFF)
        h) DELAY: 2700 (45 minutes)
        i) Click SAVE

      0_1517652613252_createOperation_RelayOff.PNG

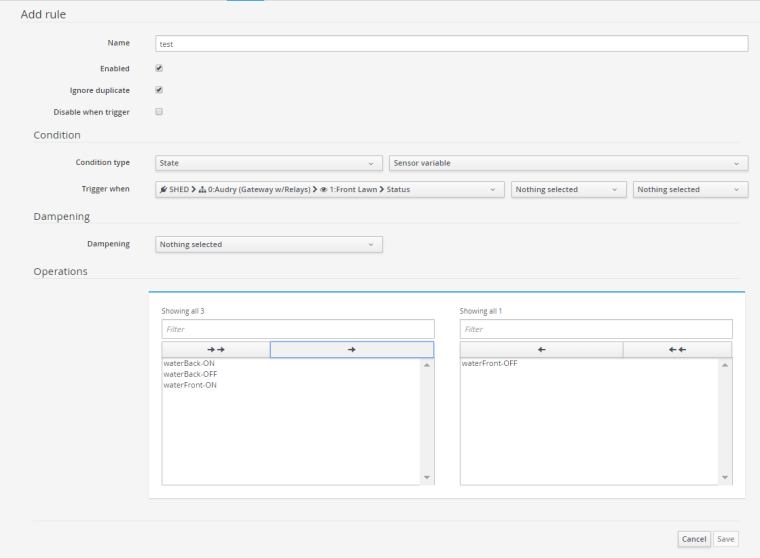
      The last step sets up the schedule as a TIMER. Select the options required for the day and time you want the SENSOR (relay) to operate, and add both of the OPERATIONS you just created to the timer.

      1. Create a TIMER to run the schedule
        a) Click RESOURCES > TIMERS > "Add Timer"
        b) Give your new TIMER a name
        c) Select ENABLED
        d) Select the schedule using the drop-down lists.
        e) In my example, I have used a NORMAL timer, that runs DAILY, with every day selected.
        f) Select the start time for the timer
        g) If you only want your timer to run between specified dates, enter them into the VALIDITY fields.
        h) Select BOTH of the OPERATION (ON and OFF) in the selection field and add them to the RIGHT column by clicking the single right arrow
        i) Click SAVE

      0_1517652479560_createTimer_OnOffwDelay.PNG

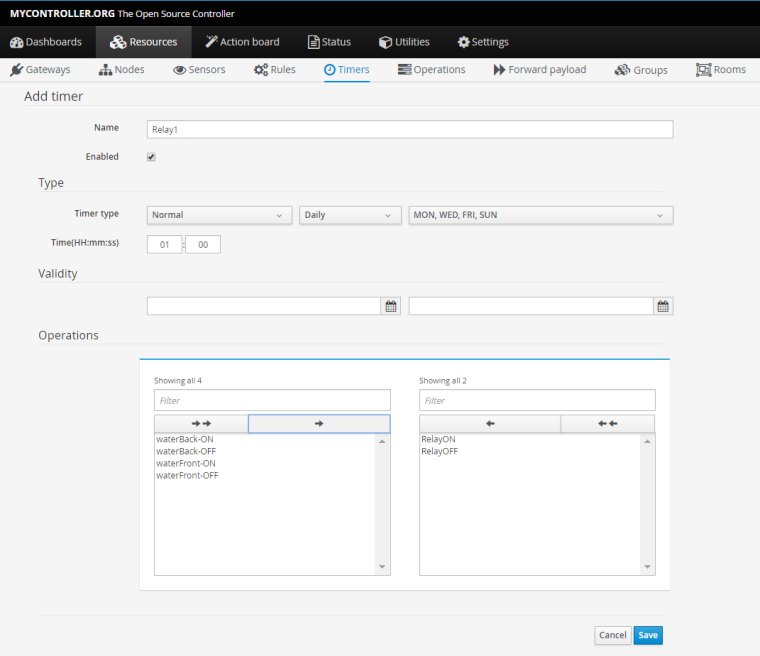
      You now have a TIMER that will activate BOTH OPERATIONS, but as your OFF OPERATION has a delay of 2700 seconds (45 minutes) the sensor (relay) will remain active until that delay has passed and the OFF OPERATION is activated.

      Hopefully this is simple enough, let me know if you'd like some pictures added to help

      posted in Getting Started
      Z
      zachflem
    • RE: Mycontroller 2.x ideas

      @jkandasa I like the scripting ability, don't get me wrong.

      But...

      I've got switches setup on the dashboard for 2 relays. It would be nice to add a feature to those switches to automatically turn them off after x seconds/minutes.

      or

      As part of the operations tab, have the option to select the sensor (in this case a relay) and set the status to "ON" and the duration to x seconds/minutes. Then setting a reoccuring timer to run, using that operation would result in the sensor (the relay) operating for the defined duration.

      I might not be explaining myself very well, I'd just like to see some scheduling into the GUI so my wife could change/setup a new watering schedule if I'm not around.

      A little off topic, but is there any documentation about scripting in mycontroller?

      posted in General Discussion
      Z
      zachflem
    • HOW TO: Automatically turn off relay after defined time

      I've covered how to turn relays on and off using a timer, now lets look at automating the off action based on a manual activation (by Dashboard button, Action Board or manually on the sensor page)

      This method will also enable an off timer on a sensor that has been turned on via an external input.

      I'll assume you have nothing setup in your system yet, other than your gateway, node and relay sensor.

      We'll begin with adding a button for your relay(s) on your dashboard for easy access, then we'll create an OPERATION to turn off the relay after a delay, and lastly we'll tie the whole lot together so your relay automatically turns off after you turn it on via the dashboard.

      1. Adding the dashboard buttons

        a) Enable edit mode on the dashboard:
        0_1517817409654_createDashboardbutton_enableEditmode.PNG

        b) Click the "PLUS" icon to open the "Add New Widget" dialog:
        0_1517817560669_clickAdd_toDashboard.PNG

        c) On the "Add New Widget" dialog, click "Sensors":
        0_1517817673929_addNewwidgetdialog.PNG

        d) On the new blank widget, click the COG to enter the settings:
        0_1517818966614_emptySensrowidget.PNG

        e) Enter the details of your sensor widget and select the sensors you want to add to the dashboard from the list:
        0_1517818806673_addSensorToDashboard.PNG
        0_1517818814296_selectSensordialog.PNG

        e) Your dashboard widget should now have some nice buttons for you to manually turn your relays on and off, finalise your new widget by clicking the highlighted check mark in the top right corner of the page:
        0_1517819136816_finishedDashboardWidget.PNG

        0_1517819145810_confirmWidget.PNG

      2. Create the OPERATION used to turn off the relay after an amount of time

        You'll need an operation for each of the sensors (relays) you want to turn off, so repeat this step for each one.

        a) Click RESOURCES > OPERATIONS > "Add Operation"
        b) Give your new OPERATION a name
        c) Select ENABLED
        d) OPERATION TYPE: Send Payload
        e) RESOURCE: Sensor Variable
        f) Select relay sensor from list
        g) PAYLOAD: 1 (ON)
        h) DELAY: 2700 (time in seconds, 2700sec / 60 = 45min)
        i) Click SAVE
        0_1517819564670_createOperation_RelayOff.PNG

      3. Add a rule to automatically turn off the relay

        a) Click RESOURCES > RULES > "Add Rule"
        b) Give your Rule a name
        c) For 'Condition type', select "STATE" and "SENSOR VARIABLE"

        The next line of the dialog defines the trigger for the rule, the workflow goes like this:
        "WHEN THIS == (equals) THAT, DO THIS'

        d) For 'Trigger when', select the sensor (relay) you want to turn off with this rule
        e) Select '==' (equals, as opposed to != which is 'does not equal') and select 'OFF' in the last dropdown.
        f) In the bottom section (Operations), select the operation you just created to turn off the sensor (relay)
        g) Hit Save!

        0_1517821069013_addRule.PNG

      Congrats! You can now press the button on your dashboard and know that the sensor (your relay) will turn off after your defined time!

      In my system, I am using this as a manual trigger for my watering system, so I can run a sprinkler zone outside of the schedule, and not have to manually turn it off.

      posted in Getting Started
      Z
      zachflem