@jkandasa here is the screenshot. I am able to access the server locally or via the DDNS url I have created and linked. I can clear this error, but it comes back each time I log into the server.

W
Offline
Posts
-
RE: Request failed with status code 401
-
Request failed with status code 401
I just got a new RPi 4 running MCv2.0 and installed remotely via ddns, I am working on ironing out the kinks and I think there was a post about this error, but I cant find it in the forum. The server appears to be running fine, though I have not yet attached any gateways. After fixing my yaml settings for influxdb, I accidentally left it disabled, I am still getting this error "Request failed with status code 401". I feel like it was something simple last time, but again, no record of the error in the forum that I can find.
Thanks in advance for the help.
-
RE: Trouble with MC v2 install on RPi 4
@jkandasa Here is the full set of my instructions that just worked.
Install Raspberry Pi OS 64-bit
Start and setup with necessary updates
Open Terminal and Web Browser
In Web BRowser, go to www.mycontroller.org, www.forum.mycontroller.org, and https://get.docker.com
In www.mycontroller.org, click on "Documentation" and navigate to "Install Docker"
In terminal activate root user by typing
sudo suInstall Docker
Begin installation of Docker by typing the following commands one at a time with enter after each
curl -fsSL https://get.docker.com -o install-docker.sh
cat install-docker.sh
sh install-docker.sh --dry-run
sh install-docker.sh(this one may take a few minutes, wait for "root@raspberrypi:/# to reappear)
(change "admin" below if your root user name is different)
usermod -aG docker admin
systemctl enable docker.service
systemctl start docker.service
systemctl is-active docker.service
(should return "active")Make MC Portable
So that you are able to move your server from location to location, you will need to setup a Docker network to manage the changing IP addresses
Enter the following in terminal:
docker network create mycontrollerInstall InfluxDB
Follow the instructions under "Install InfluxDB" for installation within Docker at www.mycontroller.org
Enter the following text commands in terminal with enter after each.(this one may take a few minutes, wait for "root@raspberrypi:/# to reappear)
mkdir -p /opt/apps/influxdb
cd /opt/apps/influxdbdocker run --rm influxdb:1.8.4 influxd config > influxdb.confOpen File Manager and navigate to /opt/apps/influxdb/influxdb.conf, double click to open and verify that it has roughly 150 lines of text in it.
In Terminal type
nano /opt/apps/influxdb/influxdb.conf
(this should open the same file in terminal and allow you to edit it)Using the up and down arrows, scroll down to the line that reads "[monitor]" and change the following from
store-enabled = true
to
store-enabled = false
press control-O followed by enter to save
press control-X to exit the nano editorEnter the following into terminal
(to return to the highest level of the file directory)
cd /(this one may take a few minutes, wait for "root@raspberrypi:/# to reappear)
mkdir -p /opt/apps/influxdb/influxdb_data
cd /opt/apps/influxdbdocker run --detach --name mc_influxdb \
--network mycontroller \
--publish 8086:8086 \
--volume $PWD/influxdb_data:/var/lib/influxdb \
--volume $PWD/influxdb.conf:/etc/influxdb/influxdb.conf:ro \
--env TZ="America/Chicago" \
--restart unless-stopped \
influxdb:1.8.4Verify that the influxdb container is running in docker with the following code in terminal
docker ps
(this should show a list of running containers, only influxdb should appear right now)(For future reference)
To see the Docker logs type in the following
docker logs mc_influxdb
To stop the influxdb in docker typle
docker stop mc_influxdb
To restart the influxdb in docker type
docker restart mc_influxdb
To uninstall influxdb in docker type
docker stop mc_influxdb
docker rm mc_influxdbInstall natsio
At www.mycontroller.org go to "Install natsio" and follow the directions as follows
Type the following into Terminal
cd /The following will cause the Pi to download a few different things and install them, it can take a few minutes.
docker run --detach --name mc_natsio \
--network mycontroller \
--publish 4222:4222 \
--env TZ="America/Chicago" \
--restart unless-stopped \
nats:2.2.2-alpineVerify that the natsio container is running in docker with the following code in terminal
docker ps
(this should show a list of running containers, only influxdb and natsio should appear right now)(For future reference)
To see docker logs type the following
docker logs mc_natsio
To stop natsio type
docker stop mc_natsio
To restart natsio type
docker restart mc_natsio
To uninstall natsio type
docker stop mc_natsio
docker rm mc_natsioInstall MQTT Broker in Docker
at www.mycontroller.org navigate to "Install Mosquitto MQTT Broker" and follow the instructions as followsIn terminal type the following commands to install the broker in docker
# create mosquitto.conf
mkdir -p /opt/apps/mosquitto
cd /opt/apps/mosquittocat << EOF > mosquitto.conf
allow_anonymous true
persistence false
persistence_location /mosquitto/data/
EOFWith the following, Pi will download some files which could take a little while.
mkdir -p /opt/apps/mosquitto
cd /opt/apps/mosquittodocker run -d --name mc_mosquitto \
--network mycontroller \
--publish 1883:1883 \
--publish 9001:9001 \
--volume $PWD/mosquitto.conf:/mosquitto/config/mosquitto.conf \
--restart unless-stopped \
eclipse-mosquitto:1.6.9Verify that the MQTT container is running in docker with the following code in terminal
docker ps
(this should show a list of running containers, influxdb, natsio, and MQTT should appear)(For future reference)
To see docker logs type the followings
docker logs mc_mosquitto
To stop MQTT broker type
docker stop mc_mosquitto
To restart MQTT broker type
docker restart mc_mosquitto
To uninstall MQTT broker type
docker stop mc_mosquitto
docker rm mc_mosquittoInstalling MyController Server v2.0
AT www.mycontroller.org, navigate to "Install with container image" and follow the directions as follows
Return to the root directory by typing
cd /
into terminalIn terminal type the following commands to install MC v2
mkdir -p /opt/apps/mycontroller/mc_home
mkdir -p /opt/apps/mycontroller/mc_home/secure_share
mkdir -p /opt/apps/mycontroller/mc_home/insecure_shareChange your dirrectory and get the defaul yaml file
cd /opt/apps/mycontrollercurl https://raw.githubusercontent.com/mycontroller-org/backend/v2.0.0/resources/sample-docker-server.yaml \
--output mycontroller.yamlOpen the yaml file to edit in nano
nano /opt/apps/mycontroller/mycontroller.yamlLike earlier, the nano command is a terminal-based text editor and you will see a file with many lines of text open in terminal.
At the top you should see a line that reads something like
"secret: 5a2f6ff25b0025aeae12ae096363b51a # !!! WARNING: CHANGE THIS SECRET !!!"
The alpha-numeric secret must be changed to anything with 1 to 32 characters, but remember what you pick.Change the yaml file so the database for influxdb points to your machine's IP address as follows:
bus:
type: embedded
topic_prefix: mc_server
server_url: nats://mc_natsio:4222
insecure: false
connection_timeout: 10smetric:
disabled: false
type: influxdb
uri: http://mc_influxdb:8086
token:
username:
password:
organization_name:
bucket_name: mycontroller
batch_size:
flush_interval: 5s
query_client_version:click control-O to save followed by enter
click control-X to exit nanoStart your MyController Server by entering the following text into terminal:
docker run --detach --name mycontroller \
--network mycontroller \
--publish 8080:8080 \
--publish 8443:8443 \
--publish 9443:9443 \
--volume $PWD/mc_home:/mc_home \
--volume $PWD/mycontroller.yaml:/app/mycontroller.yaml \
--env TZ="America/Chicago" \
--restart unless-stopped \
docker.io/mycontroller/server:2.0.0
In your web browser, check to make sure your server is running by going to http://localhost:8080 (or http://<your_ip>:8080)This should bring up a MyController login screen where your username AND password are both set to "admin"
Login to verify that it is working.On system restart, if docker and contained services do not automatically resume, use the following commands in terminal
docker restart mc_influxdb
docker restart mc_natsio
docker restart mc_mosquitto
docker restart -
RE: Trouble with MC v2 install on RPi 4
@jkandasa said in Trouble with MC v2 install on RPi 4:
@wint0178 Thanks for the details
I see you have an trailing space after \ ("--env TZ="Asia/Kolkata" \ "), that leads restart command not found
I have updated your timezone and removed the extra space, can you please try the following command to start the MyController server?Thank you so much! It looks like that single space was the issue, I had hoped it was something that simple and silly, but my knowledge is very limited and I don't think I would have figured that out. thanks again! I'll copy the full install instructions I wrote, the the changes you suggested, in a reply below.
-
RE: Trouble with MC v2 install on RPi 4
@jkandasa the running server on localhost has a warning that the Metrics database is disabled. I assume this has to do with installing MC from the binary, but it feels like progress anyway.
-
RE: Trouble with MC v2 install on RPi 4
@jkandasa I was just messing with your install from executable binary instructions and I got the MC server running and can pull it up at localhost:8080. When I run
docker ps -aI am still getting the same three services running: mqtt, influxdb, and natsio. Is this correct? -
RE: Trouble with MC v2 install on RPi 4
@jkandasa I opened the /opt/apps/mycontroller/mycontroller.yaml in vim and found it to reflect the changes that I had made in nano, so I made no other changes.
-
RE: Trouble with MC v2 install on RPi 4
@jkandasa I also checked the docker version as you asked and it is Docker version 26.0.2, build 3c863ff.
You asked about my timezone, I am in US Central timezone, the same as Chicago.
I assume if I uninstall docker to try and update it using the code you include in the documentation, as you suggested, that I will also need to reinstall influxdb, natsio, and mqtt. Is that correct?
Finally, I am not familiar with vim, but I just installed it and will check it out. I'll keep you posted. Thank you for your help!
-
RE: Trouble with MC v2 install on RPi 4
@jkandasa the response to
docker logs mycontroller
isError response from daemon: No such container: mycontrollerand the response to
docker ps -a
is:CONTAINER ID IMAGE COMMAND CREATED STATUS PORTS NAMES 8db9b7cb067c eclipse-mosquitto:1.6.9 "/docker-entrypoint.…" 5 days ago Up 5 days 0.0.0.0:1883->1883/tcp, :::1883->1883/tcp, 0.0.0.0:9001->9001/tcp, :::9001->9001/tcp mc_mosquitto 44cb484f6753 nats:2.2.2-alpine "docker-entrypoint.s…" 5 days ago Up 5 days 6222/tcp, 0.0.0.0:4222->4222/tcp, :::4222->4222/tcp, 8222/tcp mc_natsio 5c81d7e95d1a influxdb:1.8.4 "/entrypoint.sh infl…" 5 days ago Up 5 days 0.0.0.0:8086->8086/tcp, :::8086->8086/tcp mc_influxdb -
RE: Trouble with MC v2 install on RPi 4
Here is a screenshot of the docker system running with influxdb, natsio, and mqtt. Maybe something is wrong here? This was taken immediately after a system restart without running and apps or commands prior.
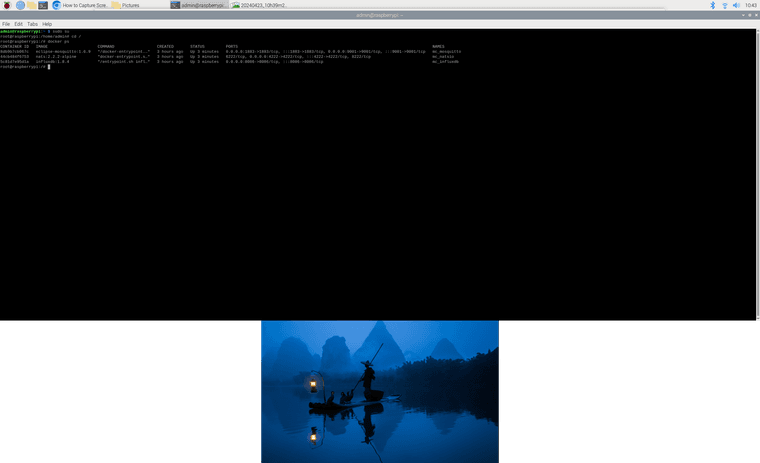
-
Trouble with MC v2 install on RPi 4
I am getting stuck in the final steps of installing MC server V2 on my RPi 4. After I have docker, influxdb, MQTT all instlalled and running on the Pi I can see they are running in my docker by running the following command "docker ps".
I then attempt to install the MyController server, but it doesnt work. Near the end of the instructions I wrote and copied below, I am not able to start the MC server after editing the yaml file in nano. Any help would be greatly appreciated.
Install Raspberry Pi OS 64-bit
Start and setup with necessary updates
Open Terminal and Web Browser
In Web BRowser, go to www.mycontroller.org, www.forum.mycontroller.org, and https://get.docker.com
In www.mycontroller.org, click on "Documentation" and navigate to "Install Docker"
In terminal activate root user by typing
sudo suInstall Docker
Begin installation of Docker by typing the following commands one at a time with enter after each
'curl -fsSL https://get.docker.com -o install-docker.sh
cat install-docker.sh
sh install-docker.sh --dry-run
sh install-docker.sh'(this one may take a few minutes, wait for "root@raspberrypi:/# to reappear)
usermod -aG docker admin
(if your non root user is "admin")
systemctl enable docker.service
systemctl start docker.service
systemctl is-active docker.service
(should return "active")Make MC Portable
So that you are able to move your server from location to location, you will need to setup a Docker network to manage the changing IP addresses
Enter the following in terminal:
docker network create mycontrollerInstall InfluxDB
Follow the instructions under "Install InfluxDB" for installation within Docker at www.mycontroller.org
Enter the following text commands in terminal with enter after each.
1.(this one may take a few minutes, wait for "root@raspberrypi:/# to reappear)
mkdir -p /opt/apps/influxdb
cd /opt/apps/influxdbdocker run --rm influxdb:1.8.4 influxd config > influxdb.confOpen File Manager and navigate to /opt/apps/influxdb/influxdb.conf, double click to open and verify that it has roughly 150 lines of text in it.
In Terminal type
nano /opt/apps/influxdb/influxdb.conf
(this should open the same file in terminal and allow you to edit it)
Using the up and down arrows, scroll down to the line that reads "[monitor]" and change the following from
store-enabled = true
to
store-enabled = false
press control-O followed by enter to save
press control-X to exit the nano editorEnter the following into terminal
1. (to return to the highest level of the file directory)
cd /
2. (this one may take a few minutes, wait for "root@raspberrypi:/# to reappear)
mkdir -p /opt/apps/influxdb/influxdb_data cd /opt/apps/influxdbdocker run --detach --name mc_influxdb \
--network mycontroller \
--publish 8086:8086 \
--volume $PWD/influxdb_data:/var/lib/influxdb \
--volume $PWD/influxdb.conf:/etc/influxdb/influxdb.conf:ro \
--env TZ="Asia/Kolkata" \
--restart unless-stopped \
influxdb:1.8.4]Verify that the influxdb container is running in docker with the following code in terminal
docker ps
(this should show a list of running containers, only influxdb should appear right now)To see the Docker logs type in the following
docker logs mc_influxdb
To stop the influxdb in docker typle
docker stop mc_influxdb
To restart the influxdb in docker type
docker restart mc_influxdb
To uninstall influxdb in docker type
docker stop mc_influxdb
docker rm mc_influxdbInstall natsio
At www.mycontroller.org go to "Install natsio" and follow the directions as follows
Type the following into Terminal
cd /
(the following will cause the Pi to download a few different things and install them, it can take a few minutes)
docker run --detach --name mc_natsio \
--network mycontroller \
--publish 4222:4222 \
--env TZ="Asia/Kolkata" \
--restart unless-stopped \
nats:2.2.2-alpine
Verify that the natsio container is running in docker with the following code in terminal
docker ps
(this should show a list of running containers, only influxdb and natsio should appear right now)To see docker logs type the following
docker logs mc_natsio
To stop natsio type
docker stop mc_natsio
To restart natsio type
docker restart mc_natsio
To uninstall natsio typeInstall MQTT Broker in Docker
at www.mycontroller.org navigate to "Install Mosquitto MQTT Broker" and follow the instructions as follows
In terminal type the following commands to install the broker in docker
# create mosquitto.conf
mkdir -p /opt/apps/mosquitto
cd /opt/apps/mosquittocat << EOF > mosquitto.conf
allow_anonymous true
persistence false
persistence_location /mosquitto/data/
EOF
(With the following, Pi will download some files which could take a little while)
mkdir -p /opt/apps/mosquitto
cd /opt/apps/mosquittodocker run -d --name mc_mosquitto \
--network mycontroller \
--publish 1883:1883 \
--publish 9001:9001 \
--volume $PWD/mosquitto.conf:/mosquitto/config/mosquitto.conf \
--restart unless-stopped \
eclipse-mosquitto:1.6.9
Verify that the MQTT container is running in docker with the following code in terminal
docker ps
(this should show a list of running containers, influxdb, natsio, and MQTT should appear)To see docker logs type the followings
docker logs mc_mosquitto
To stop MQTT broker type
docker stop mc_mosquitto
To restart MQTT broker type
docker restart mc_mosquitto
To uninstall MQTT broker type
docker stop mc_mosquitto
docker rm mc_mosquittoInstalling MyController Server v2.0
AT www.mycontroller.org, navigate to "Install with container image" and follow the directions as follows
Return to the root directory by typing
cd /
into terminal
In terminal type the following commands to install MC v2
mkdir -p /opt/apps/mycontroller/mc_home
mkdir -p /opt/apps/mycontroller/mc_home/secure_share
mkdir -p /opt/apps/mycontroller/mc_home/insecure_share
Change your dirrectory and get the defaul yaml file
cd /opt/apps/mycontrollercurl https://raw.githubusercontent.com/mycontroller-org/backend/v2.0.0/resources/sample-docker-server.yaml \
--output mycontroller.yaml
Open the yaml file to edit in nano
nano /opt/apps/mycontroller/mycontroller.yamlLike earlier, the nano command is a terminal-based text editor and you will see a file with many lines of text open in terminal.
At the top you should see a line that reads something like
"secret: 5a2f6ff25b0025aeae12ae096363b51a # !!! WARNING: CHANGE THIS SECRET !!!"
The alpha-numeric secret must be changed to anything with 1 to 32 characters, but remember what you pick.Change the yaml file so the database for influxdb points to your machine's IP address as follows:
bus:
  type: embedded
  topic_prefix: mc_server
  server_url: nats://mc_natsio:4222
  insecure: false
  connection_timeout: 10s


 metric:
    disabled: false
    type: influxdb
    uri: http://mc_influxdb:8086
    token:
    username:
    password:
    organization_name:
    bucket_name: mycontroller
    batch_size:
    flush_interval: 5s
    query_client_version:
click control-o to save followed by enter
click control-x to exit nanoThis is where I get hung up, but I'm not sure if I have settings above here incorrect or if there is something wrong with the following install/run commands.
Start your MyController Server by entering the following text into terminal:
docker run --detach --name mycontroller \
  --network mycontroller \
  --publish 8080:8080 \
  --publish 8443:8443 \
  --publish 9443:9443 \
  --volume $PWD/mc_home:/mc_home \
  --volume $PWD/mycontroller.yaml:/app/mycontroller.yaml \
  --env TZ="Asia/Kolkata" \
  --restart unless-stopped \
  docker.io/mycontroller/server:2.0.0
In your web browser, check to make sure your server is running by going to http://localhost:8080 (or http://<your_ip>:8080)
This should bring up a MyController login screen where your username AND password are both set to "admin"
Login to verify that it is working.On system restart, resume docker containers with the following commands in terminal
docker restart mc_influxdb
docker restart mc_natsio
docker restart mc_mosquitto
docker restart -
RE: Remote access to MCv2 Dashboard
@skywatch I was able to setup several MQTT Gateways using NodeMCU boards with attached I2C sensors. The Gateways are all Wifi gateways, but I have been able to use my DDNS in place of the IP address to send data from several locations including one that is international. I think this is working well at this point. Thank you for your reply!
-
RE: Adding MySensor V2.3.2 sensors to MC v2
OK, I'm not exactly sure what I did, but my student was able to edit the example sketch from MySensors V2 "GatewayESP8266MQTTClient" and add in code to send data from the Adafruit BME680 over MQTT. Once I added that code to my NodeMCU and added the # to the subscribe list in my gateway, it all just seemed to automatically add.
I should acknowledge that I had a misunderstanding about what physical components were nodes, sources, and fields. For some reason I thought that my NodeMCU was a gateway (this is true), it was also a node (this was not true), and that the BME680 was the source with several fields on it (TEMP, PRESS, HUMM). I believe I see now that the Node is actually the BME680 board and it has several separate sources, the physical sensors for each of the conditions it monitors and those numeric values, once acquired, become fields that the MC server can publish.
I am going to play some more with this since I would like to add all sorts of other nodes with a wide range of sources.
-
RE: Setting up MQTT
@jkandasa Yes, I am using MySensor V2.3.2 (I belive it is the lates reliece) and I have been able to get the MQTT gateways up and running. On the first one, it also automatically added it as a node, which seemed to be pretty great, but then the node would not mount again after I restarted the Gateway and once the GW was mounted into the dashboard. I'm not sure what was going on with that, but I have since connected the MQTT gateways through my DDNS and believe this will allow them to live anywhere they have internet. I'm not sure exactly what to do about the nodes since I have not been able to successfully add a node from either of my gateways.
-
Adding MySensor V2.3.2 sensors to MC v2
I have finally been successful at getting the MC server running on a RPi (4, 8GB) at my house with port forwarding and DDNS to provide remote access.
The other day I was also able to get a NodeMCU 1.0 (ESP8266) board setup using MySensor example sketch "GatewayESP8266MQTTClient", which also automatically added a the board as a node to my resources.
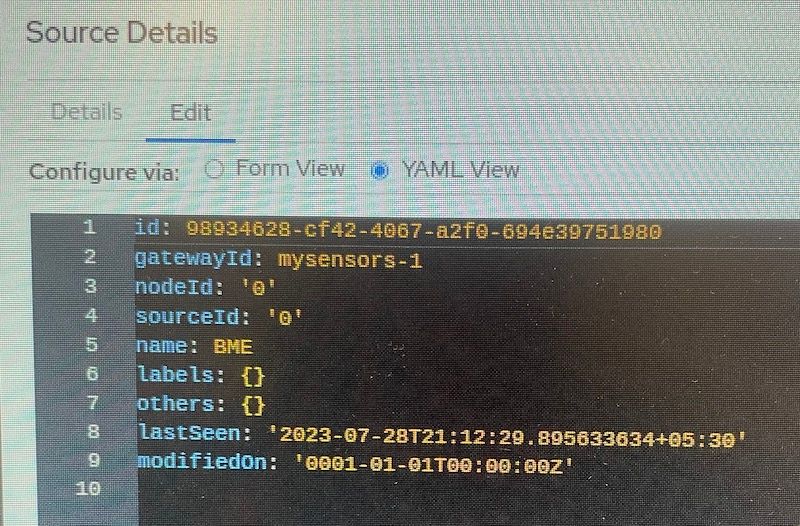
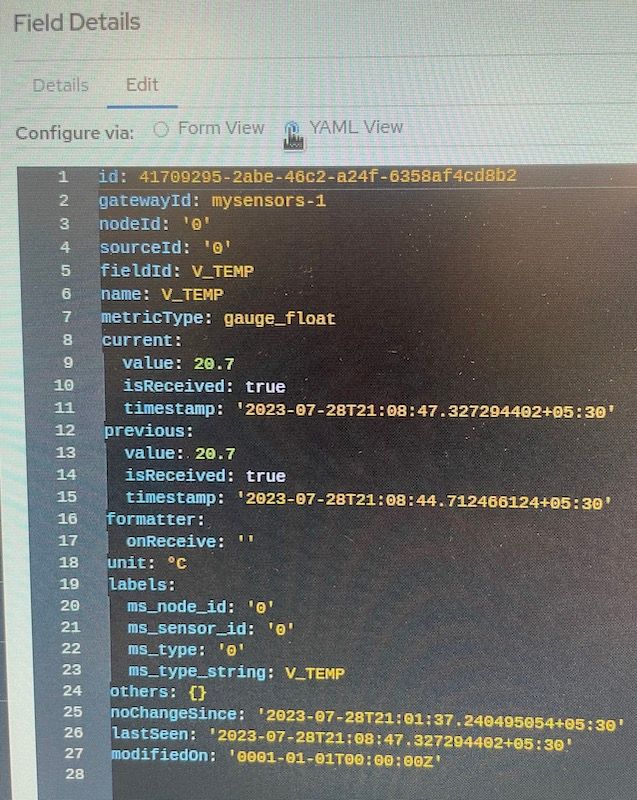
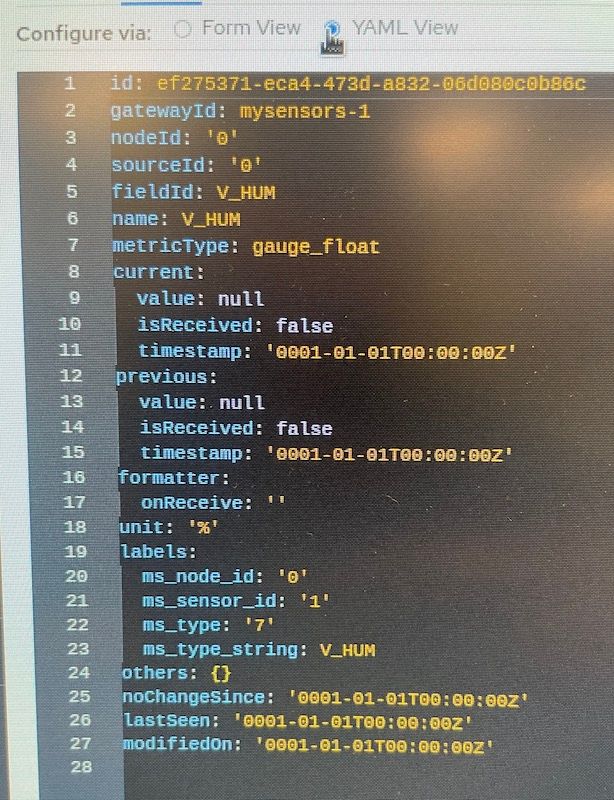
Now, I am working on getting an actual sensor breakout board (source), Adafruit BME680 (temp, hum, press) wired to the NodeMCU gateway and sending sensor (field) data to my dashboard. My student was able to get one field sent, temperature, but we are not able to duplicate this with the other two field sources on the BME680. !
Here are some pictures of the settings that might help someone give us a direction to go.
This is the YAML view of the Source (BME680)
This is the YAML view of the Temp field that is working
This is the YAML view of the Hum fild that is not working
Thanks, in advance for any help you can provide. We will keep tinkering and reading about this, but we appreciate any insight you can provide.
-
RE: Setting up MQTT
I think I might have had a breakthrough. As I was working with the settings on the NodeMCU, MC Server web portal, and my internet router to setup the MQTT gateway, I turned on tcp port forwarding for 1883 to my RPi. As soon as I had done that, a node popped up under the Gateway and I was able to name the node "NodeMCU-1" it took a few minutes for the Gateway to show up too, but it did after a bit.
I'm curious if I need to use the added numbers and slashes for the topics to send and subscribe to. I notice that the serial output of my Arduino IDE while the board is still hooked up added some slashes and digits. Are those like an address for the specific data coming from that Gateway?
-
Setting up MQTT
I have my MCv2 server running on a brand new RPi 4 (8GB with 32 GB microSD) it is running on the newest version of Raspberry Pi OS 64-bit with no problems. I am also using the free DDNS service provided from my internet router (Netgear) along with port forwarding of 8080 to the internal device IP address so that I can get access to the server from anywhere. I am wanting to get several MQTT gateways connected, but I'm not sure I understand how to get the MQTT broker linked with the gateways and MC Server. I am using MySensors and the example sketches they provide for NodeMCU 1.0 (ESP8266) in Arduino IDE. Do I need to setup another port to forward on my router? Any introductory information or advice that you can provide would be appreciated.
As always, I'll keep digging and fiddling with this. I'll add any updates as I have them.
-
RE: SSD filled overnight
@jkandasa I'm still not sure what happened. In the end, I decided to reformat the drive and start from scratch. I needed to write out some concise instructions for installing all of the software anyway and this was the right time to take care of that. Anyway, I have it installed again and running on the same drive with DDNS on my home router. I have port 8080 being forwarded to the http for my DDNS. I will monitor to see if something like this happens again, but this time I used the built-in SD Card Copier to make a copy of the drive after installing the server, maybe this will be a viable backup.
-
RE: SSD filled overnight
@wint0178 I'm not sure what's going on, but I decided to stop the docker apps and then restart the Pi, it is stuck on a black screen with a single horizontal text cursor blinking in the upper left corner. I removed the ssd and thought I would try to clone it onto a larger ssd, but when I looked at the drive there is plenty of space, well over 10 GB on the 32 GB drive. Yet, when I checked the drive in file manager it said there was no space. Additionally, I got a warning from Google drive on the web browser that some features were not available due to lack of memory AND from Arduino IDE when I tried to compile a sketch, it said there was no space. It seems as though there is a very small partition on the drive that is set too small, but file manager was able to view it as a 32 GB drive. Any ideas?
I am still hoping to simply clone to a 64 GB drive, but don't have the time before I leave for a family road trip.
-
SSD filled overnight
I just got MC server running yesterday on a RPi 4 (4GB) with 32 GB drive. I'm not sure what settings could have caused this, but I've got to imagine I need to make some changes to the types of data that are stored or the frequency. Any insights would be appreciated. Thanks!